Около Dependabot
Это руководство по быстрому старту проводит вас через настройку, включение Dependabot, просмотр Dependabot alertsи обновление вашего репозитория для использования защищённой версии зависимости.
Dependabot состоит из трех различных функций, которые помогают управлять зависимостями:
- Dependabot alerts: сообщите об уязвимостях в зависимости, которые вы используете в репозитории.
- Dependabot security updates: автоматически вызывают запросы на вытягивание для обновления зависимостей, которые используются с известными уязвимостями системы безопасности.
- Dependabot version updates: автоматически вызывают запросы на вытягивание, чтобы обеспечить актуальность зависимостей.
Необходимые условия
Для целей этого руководства мы будем использовать репозиторий демонстраций, чтобы показать, как Dependabot находит уязвимости в зависимостях, где можно видеть Dependabot alerts на GitHub, и как можно исследовать, исправлять или игнорировать эти оповещения.
Сначала необходимо создать демонстрационный репозиторий.
- Перейдите к https://github.com/dependabot/demo.
- Вверху страницы, справа — нажмите Fork.
- Выберите владельца (вы можете выбрать личный GitHub аккаунт) и введите имя репозитория. Дополнительные сведения о вилке репозиториев см. в разделе Fork a repository.
- Нажмите Создать вилку.
Включение Dependabot вашего репозитория
Выполните приведенные ниже действия в репозитории, который вы вилировали в предварительных требованиях.
-
На GitHubперейдите на главную страницу репозитория.
-
Под именем репозитория щелкните Settings. Если вкладка "Параметры" не отображается, выберите раскрывающееся меню и нажмите кнопку "Параметры".

-
В разделе "Безопасность" боковой панели щелкните Advanced Security.
-
Под "Dependabot", нажмите Включить для Dependabot alerts, Dependabot security updates, и Dependabot version updates.
-
Если вы нажали Включить для Dependabot version updates, вы сможете отредактировать стандартный
dependabot.ymlконфигурационный файл, который GitHub создается для вас в/.githubкаталоге вашего репозитория. Чтобы включить Dependabot version updates репозиторий, вы обычно настраиваете этот файл под свои нужды, редактируя стандартный файл и внося изменения. Пример см. в фрагменте кода, предоставленном в Настройка обновлений версий Dependabot .

Примечание.
Если граф зависимостей для репозитория ещё не включён, GitHub он будет автоматически активирован при включении Dependabot.
Для получения дополнительной информации о настройке каждой из этих Dependabot функций смотрите Настройка оповещений Dependabot, Настройка обновлений для системы безопасности Dependabot, Настройка обновлений версий Dependabot.
Просмотр Dependabot alerts для вашего репозитория
Если Dependabot alerts репозиторий включен, вы можете посмотреть Dependabot alerts его на Security and quality вкладке репозитория. Вы можете использовать форкированный репозиторий, на котором вы включили Dependabot alerts в предыдущем разделе.
-
На GitHubперейдите на главную страницу репозитория.
-
Под названием репозитория нажмите на Security and quality вкладку. Если вы не видите вкладку « Security and quality» — выберите выпадающее меню и нажмите Security and quality.
-
В разделе «Находки» боковой панели выберите Dependabot выпадающее меню, затем нажмите «Уязвимости».
-
Ознакомьтесь с открытыми уведомлениями на Dependabot alerts странице. По умолчанию на странице отображается вкладка "Открыть **", в которой перечислены открытые оповещения. (Вы сможете просматривать все закрытые оповещения, щелкнув ** кнопкуЗакрыто.)
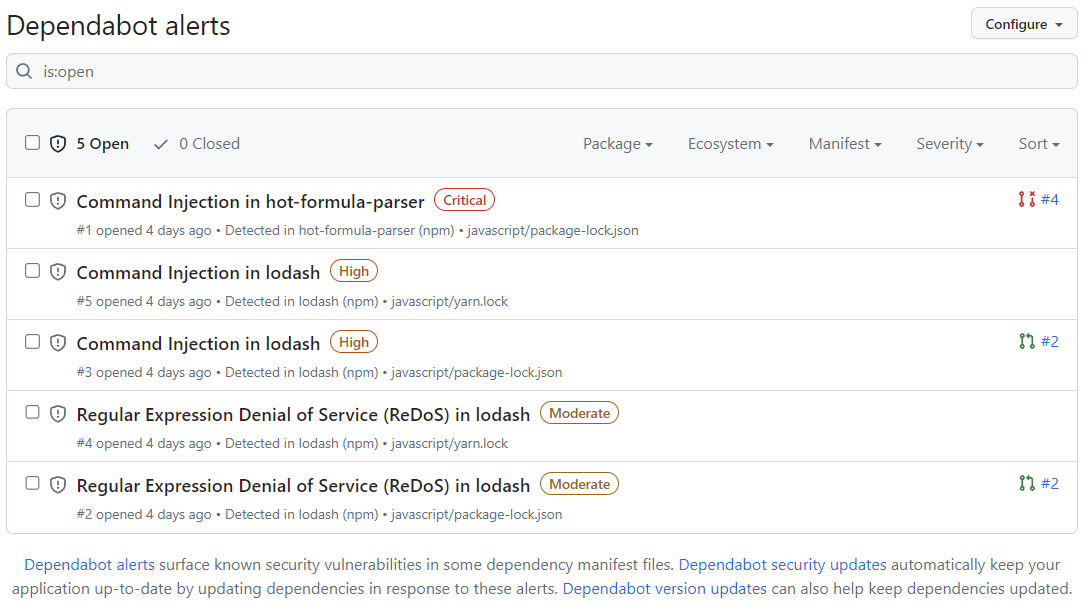
Вы можете фильтровать Dependabot alerts в списке, используя различные фильтры или метки. Дополнительные сведения см. в разделе Просмотр и обновление оповещений Dependabot. Вы также можете фильтровать Правила автообработки зависимостей ложные срабатывания или оповещения, которые вас не интересуют. Дополнительные сведения см. в разделе Правила автообработки зависимостей.
-
Щелкните оповещение
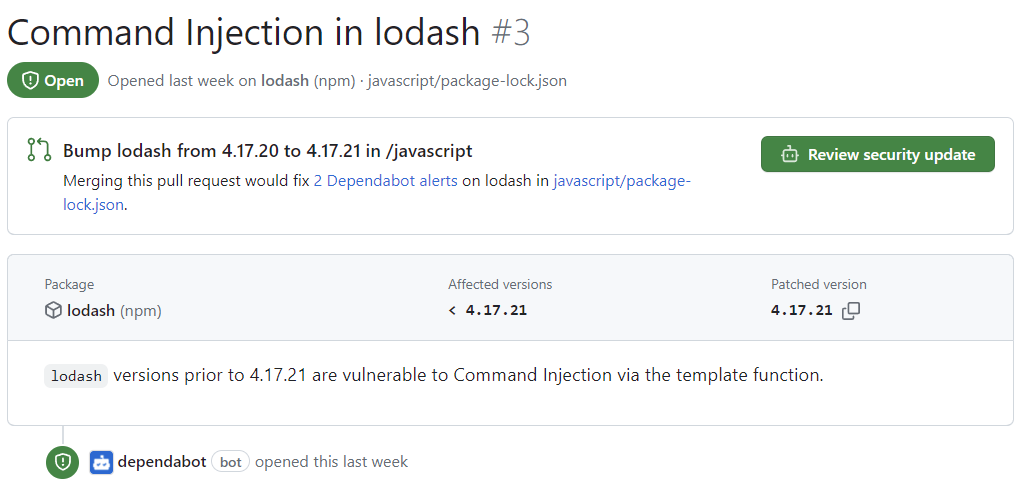
javascript/package-lock.json"Внедрение команд в lodash" в файле. На странице сведений для оповещения отображаются следующие сведения (обратите внимание, что некоторые сведения могут не применяться ко всем оповещениям):- Создал Dependabot ли я pull request, который исправит уязвимость. Чтобы просмотреть предлагаемое обновление системы безопасности, нажмите кнопку "Проверить обновление безопасности".
- Пакет, участвующий
- Затронутые версии
- Исправленная версия
- Краткое описание уязвимости
-
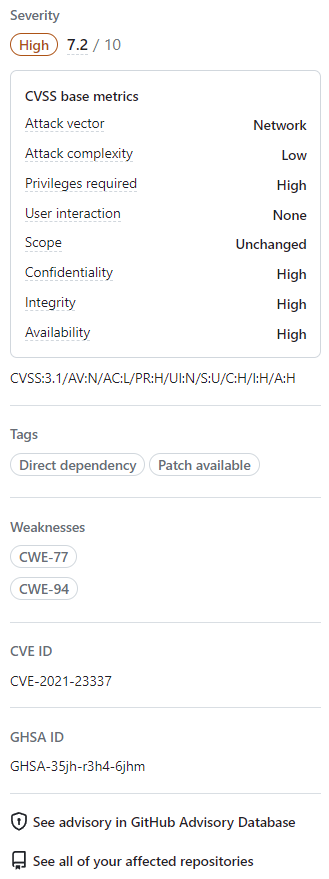
Кроме того, можно также просмотреть сведения в правой части страницы. Некоторые сведения, показанные на снимке экрана, могут не применяться к каждому оповещению.
- Severity
- Метрики CVSS: мы используем уровни CVSS для назначения уровней серьезности. Дополнительные сведения см. в разделе База данных GitHub Advisory.
- Tags
- Слабые места: список CWEs, связанных с уязвимостью, если применимо
- ИДЕНТИФИКАТОР CVE: уникальный идентификатор CVE для уязвимости, если применимо
- GHSA ID: Уникальный идентификатор соответствующего уведомления на GitHub Advisory Database. Дополнительные сведения см. в разделе База данных GitHub Advisory.
- Возможность перейти к уведомлению на сайте GitHub Advisory Database
- Возможность просмотреть все репозитории, затронутые этой уязвимостью
- Возможность предложить улучшения для этого предупреждения GitHub Advisory Database


Для получения дополнительной информации о просмотре, расстановке приоритетов и сортировке Dependabot alertsсм. АВТОТИТРЫ.
Исправление или отклонение Dependabot оповещения
Вы можете исправить или отклонить Dependabot alerts .GitHub Давайте продолжаем использовать вилированный репозиторий в качестве примера и оповещение "Внедрение команд в lodash", описанное в предыдущем разделе.
- Перейдите к Dependabot вкладке репозитория. Для получения дополнительной информации смотрите раздел «Просмотр Dependabot alerts » для вашего репозитория выше.
- Щелкните оповещение.
- Щелкните оповещение
javascript/package-lock.json"Внедрение команд в lodash" в файле. - Просмотрите оповещение. Можно сделать следующее:
-
Просмотрите предлагаемое обновление системы безопасности, нажав кнопку "Проверить обновление безопасности". Это откроет pull-запрос, сгенерированный Dependabot с исправлением безопасности.
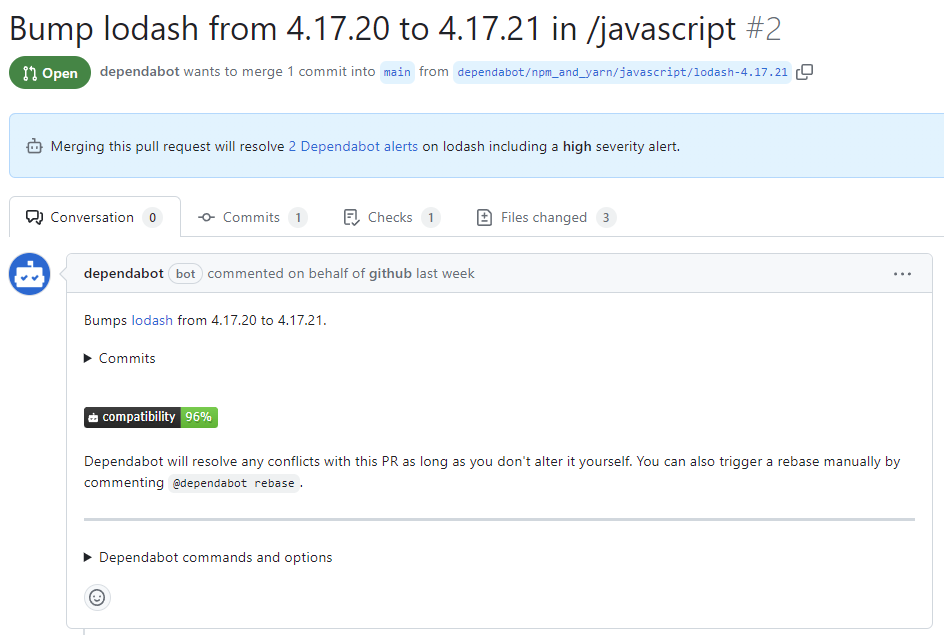
- В описании запроса на вытягивание можно нажать кнопку "Фиксации ", чтобы изучить фиксации, включенные в запрос на вытягивание.
- Вы также можете нажать Dependabot команды и опции , чтобы узнать о командах, которые можно использовать для взаимодействия с pull request.
- Когда вы будете готовы обновить зависимость и устранить уязвимость, объедините запрос на вытягивание.
-
Если вы решите, что вы хотите закрыть оповещение
-
Вернитесь на страницу сведений об оповещении.
-
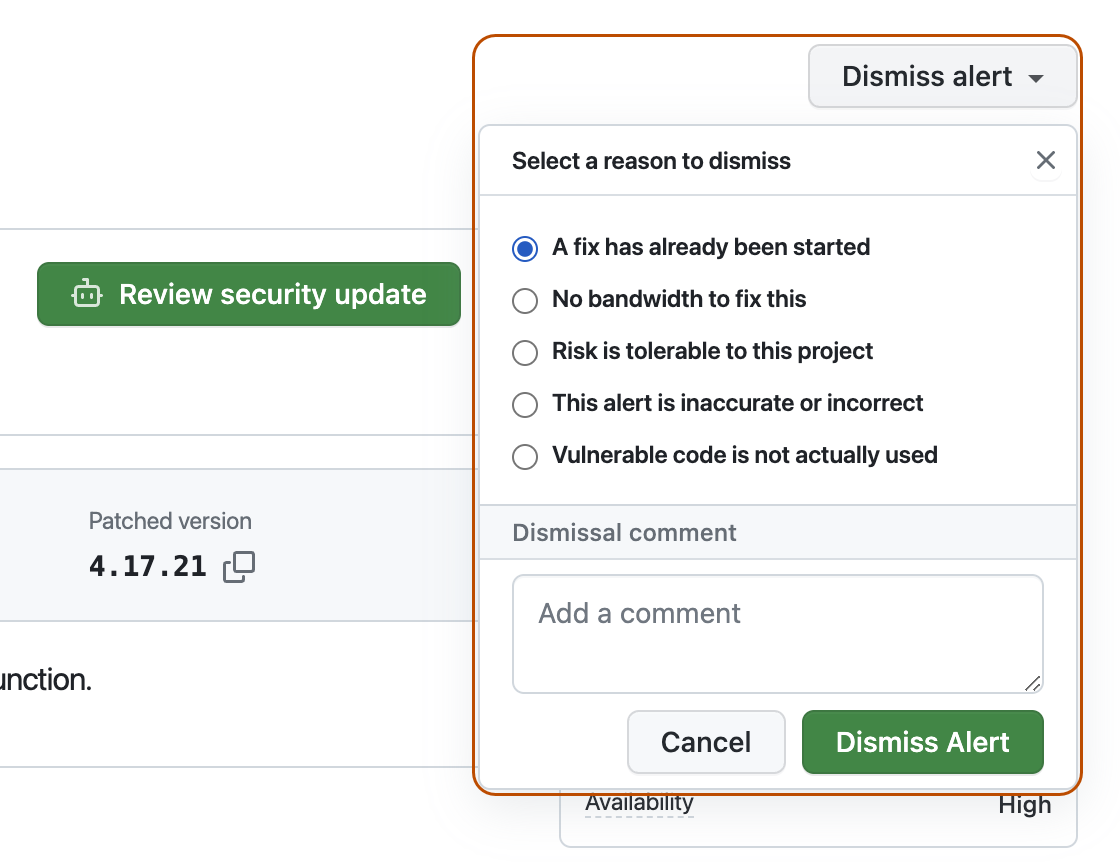
В правом верхнем углу нажмите кнопку "Закрыть оповещение".
-
Выберите причину увольнения оповещения.
-
При необходимости добавьте комментарий о закрытии. Комментарий о закрытии будет добавлен на временную шкалу оповещений, и он может использоваться в качестве обоснования для аудита или отчетов.
-
Щелкните Закрыть оповещение. Оповещение больше не отображается на вкладке "Открыть" списка оповещений, и вы можете просмотреть его на вкладке " Закрыто".
-
-


Для получения дополнительной информации о рецензировании и обновлении Dependabot alertsсм. Просмотр и обновление оповещений Dependabot.
Troubleshooting
Если вам может потребоваться выполнить некоторые действия по устранению неполадок:
- Dependabot блокируется в создании pull request для исправления оповещения или
- Информация, которую вы ожидали Dependabot , совсем не такая, как вы ожидаете.
Дополнительные сведения см. в разделе [AUTOTITLE и Ошибки dependabot](/code-security/reference/supply-chain-security/troubleshoot-dependabot/vulnerability-detection) соответственно.
Дальнейшие действия
Для получения дополнительной информации об настройке Dependabot обновлений смотрите Настройка обновлений для системы безопасности Dependabot и Настройка обновлений версий Dependabot.
Для получения дополнительной информации о конфигурации Dependabot для организации см. Настройка оповещений Dependabot.
Для получения дополнительной информации о просмотре pull request, открытых , Dependabotсм. Управление запросами на вытягивание для обновлений зависимостей.
Для получения дополнительной информации о рекомендациях по безопасности, которые вносят вклад Dependabot alertsв , см. Просмотр рекомендаций по безопасности в базе данных рекомендаций по GitHub.
Для получения дополнительной информации о настройках уведомлений Dependabot alertsо , смотрите Настройка уведомлений для оповещений Dependabot.